|
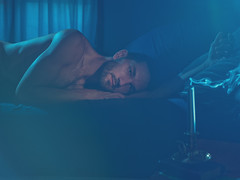
| Believe... (Model: Katie Johnson) |
Through the encouragement of two friends of mine, I submitted my portfolio to the [FRAMED] - Brooke Shaden: Photography Challenge. I guess I wasn't keeping good tabs on my email, because by pure fluke, I happened upon an email on January 11th that informed me that I was one of 4 photographers selected to participate in the event. I'm a pretty skeptical person, so I immediately read the email to one of my close friends for advice, and then I replied to the email to make sure it was legit. Turns out, it was 100% legit.
Saying I was "excited" would be an understatement. But, there was one major problem... I received the email late on January 11th, and somehow had to get myself to Malibu, CA by January 14th... 8:45am. Yikes! Pricing flights and hotels, it was quite clear that this adventure was gonna cost me an arm and a leg... and then some. So, I did some quick coordinating to make sure things around home would be okay, and then I got the approval from my employer to take a couple days off, and the next thing you know... I'm on a plane to California.
 |
| Me... at the airport. |

I love to fly. I actually wanted to be an air force pilot when I was a boy. But I gotta be honest with you... traveling is stressful for me. And when I'm on a tight timeline like this, it's stressful times one thousand. Overall, everything went smooth. But I ran into a logistical problem that cost me hundreds of dollars. Turns out that there wasn't really a very convenient place for me to fly into. No matter how I factored things, there was going to be a major distance to travel... either from the airport to the hotel, or from the hotel to the shooting location. I chose to have the large distance be between the airport and hotel. I felt pretty prepared when I left, from a "cash" perspective. But the cab ride from the airport to the hotel quickly added up... in fact, it got to the point where I felt I may be walking on the California highways, because my cash on-hand wouldn't cover the cab fare. Literally, the cab ride cost me hundreds of dollars... sapping me of all cash I had. If you thought the flight and short timeframe was stressing me out, let me tell you that the cab ride had me freaking, big-time.


 |
| Taking pics during the cab ride from hell... |
 |
| On video phone with Nicole, trying to figure out what I was going to do now that I didn't have any cash left after the cab ride. |
 |
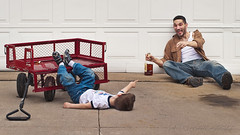
| It was a long day... I deserved a pizza. Mmmm... pizza! |


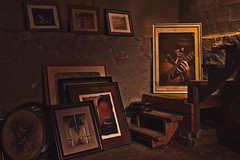
 |
| The shoot location. |


So... the cabby dropped me off in a parking lot in the hills of Malibu. I wasn't comfortable at all with this. Here I am with a suitcase and my camera gear, in a place that I can't even get a cell phone signal. What if I'm in the wrong place? How would Framed contact me? More ugh!
Well, luckily a few people congregated in that parking lot, and I evesdropped on their conversation enough to know that they were the other photographers that had been selected. I sauntered over and we did some introductions.

Eventually, Brooke Shaden arrived, and so did the Framed crew. After almost 4 days, I finally felt a sense of relief. That I was at the right place, with the right people, and I could now relax and have some fun.
Admittedly, a few of us were pretty nervous... we didn't have any idea what was in store for us. Framed, and Brooke, kept our mission pretty hush-hush, because they didn't want us leaking any of the information to the public.
After some pleasentries, we started on a mile-long hike into the hills of Malibu. We all had a fair amount of gear to carry with us, especially the camera crew with all their cameras and what-not. We seemed to walk forever.

 |
| The [F]ramed camera crew scoping out the location. |

I've been a fan of Brooke Shaden's work for a couple of years now. I followed her very closely on Flickr for quite some time, and eventually got to see her career blossom into something very successful. So being there with her, and learning from her, was a dream come true. She's so nice, and extremely open and helpful.
Brooke began to gradually talk about what we were going to be doing. Yet, she still kept the ultimate goal a secret. In the meantime, we all had to do interviews for the Framed show... which we were all pretty nervous about, but I felt we all did well considering.
And then the moment of truth... Brooke let us know what our assignment would be, and we had a very short time to complete it. A few of us were quite stressed because of the amount of work we had to do in such a short period of time. We all had to select some props, develop an idea, get a model, and then shoot.
This, was quite nerve racking for me. I'm used to taking hours to develop ideas and do the shots. But now I'm basically being told to do it in about 30 minutes. Ugh!
I kind of didn't do what I was told for part of it. I was supposed to have used part of the old house in my shot, but I deviated off to a small waterfall that looked pleasant. I grabbed a candle and an umbrella... my idea, was to create a contradiction between water and fire. Usually, water extinguishes fire... so I wanted to create a pathway of fire, where the person igniting the fire knew that rain was immenent, but had faith that the fire would burn strong. The concept was basically that the subject believed in their path in life so much, that even the inevitable didn't dissuade them from their journey.
My setup was in a really crappy location. Getting the model to her spot was tricky, because one false step, and we were gonna end up in the pond. But, we managed to get the model in place, and me back and forth, without anybody taking a swim.
After setting up the camera and placing the model, we took a couple different shots with slightly different poses. At one point, I even had Brooke sit next to the model and throw water into the air, as I wanted to make it look like it was raining, without having to add the rain in post-processing. But, the throwing water thing didn't work out too well, so I left it out of the final image. The next step, was to create the pathway of candles, so I let the model and Brooke go, because I didn't need them for this part. To create the candle pathway, I tied the candle onto a fairly long stick, then lit the candle. Starting near the camera, I submerged the end of the stick in the water, to make the candle look like it was floating... I had the camera automatically taking pictures while I did this, so that I could get the candle at various angles and heights. Then, I would move away from the camera a few feet, and repeat. I did this maybe 3 or 4 times, until I was back where the model had been standing. This gave me a handful of shots of the candle at various angles, and various distances, allowing me then to make copies of the candle and place them randomly about in post-processing, until I had a somewhat convincing pathway (I'm really not happy with how it turned out, but at the the same time, it isn't too terrible). The post-processing took me maybe 2 hours... copying all those candles was a pain, and I had lots of layers going on in Photoshop, which was tough to manage (and, which is why I stay away from compositing usually).
Overall, I think we all did very well considering the pressure to produce a complete shot in a short period of time. The other photographers were a pleasure to talk to, and shoot with. The camera crew too, were very professional, yet personable. I think we all had a really great time.
 |
| Brooke and I. |
 |
| Brooke doing some autographs for me. |
When all our shots were complete, we had to do some wrap-up interviews, and then we trudged back to the vehicles. The hike back seemed to take forever... and then we said our goodbyes.
Luckily for me, one of the other photographers (Ed) offered to drive me back to Santa Monica, to save me on cab fare (thanks again Ed). Boy was I appreciative. Then I grabbed a cab back to LA, and flew home.
I had a lot of hesitation being a part of this. It was a long way to go for such a short session. But I gotta tell you, that it's one of the best things I've done in a long, long time. Even with all the stress, and with the financial obligation, I'm so glad I did it.
I want to thank all the people involved with this. I want to thank my boss for allowing me to take the time off of work. I also need to send out a huge thank you to my mom for watching my son while I was gone. Aaron Lindemann and Nicole Jolly, you two encouraged me to submit my work, and ultimately I would not have gotten out to do this had it not been for you two... thank you so much! [F]ramed Network, thank you for this opportunity, and for doing such a great job shooting and editing the video. And Brooke, thank you so much for seeing whatever you saw in my work which caused you to select me for this... it was an honor to be invited, I learned a ton from you, and I just want to thank you so much for everything.
More >>